This is the first article in a series that I will write about on the topic of parallel programming and CUDA. In this guide I will explain how to install CUDA 6.0 for Mac OS X. CUDA is a proprietary programming language developed by NVIDIA for GPU programming, and in the last few years it has become the standard for GPU computing. GPU computing is a new branch of computer science and, more specifically, of parallel computing.
I will cover parallel computing in detail in later articles, but if I had to outline in a few words what parallel computing is I would say that it is the partition of repetitive (and therefore often time consuming) tasks into singular tasks, each of which is performed by a single core or processing unit.
To better explain the key concept behind parallel computing, let me give you a more "realistic" example. You have to move to a new town and are looking to hire a furniture mover company. You have two choices: the first company can provide you with the strongest man alive driving the world's fastest van. The second one instead has 5 normal men available, each of them with a van of average speed. What would you prefer? Of course it depends of how much stuff you have to move and how much time you have to do it.
If you need the work done quickly and have to move a lot of furniture, of course you will chose the second company. Each of the men is much slower than the strong guy, but if they are able to transport your load concurrently they will have the time to complete the task, have a beer together and come back to their family before the strong guy has done half the work. GPU computing is like having hundreds and thousands of skinny guys with old vans, which can be pretty effective.
This is the main idea about parallel computing. What follows are the instructions to install the necessary software to use thousands of "vans" to enhance the performance of your code.
CUDA Installation On Mac OSX
In this guide, I explain how to install CUDA 6.0 (the latest release as I write) on your computer under OS X.

Finder menu "GO"
General System Requirements
There are some general requirements which are common regardless of the operating system you use. The most important one is a CUDA-capable GPU, so you need a recent NVIDIA graphics card. A full list is available here. The other requirement is to have the CUDA Toolkit, which is free and provides you all you need to install and run CUDA code. By clicking on this link you will open the download page. Choose your operating system (in this case I presume Mac OS X) and then download the package by clicking on PKG.

CUDA 6.0 Downloads page
If you don't know the card/cards available on your Mac, then just go to Application > Utilities > System Information or search for System Information with Spotlight in this way and click on the icon.

Searching with Spotlight
Then look for Graphics/Displays and you will get information on your graphics card, including the name. In this case I have two of them and, fortunately, one of them is an NVIDIA.

System Information - Graphics/Displays
Mac OS X Requirements
If you want to install CUDA 6.0 on a Mac you need to have OS X 10.8 (Lion) or later running on your computer. If you don't, you can download Mavericks (OS X 10.9) from the App Store, which is free. In the situation where you cannot install OS X 10.8 or later, don't worry: you can install older CUDA releases. The installation is similar, but if some of you experience trouble, I will provide help in future articles.
In order to use CUDA 6.0 you need the GNU Compiler Collection (gcc) and clang on your Mac. They are compliers for the C-family of programming languages and CUDA is a library for them. Actually, you will code the "serial" (non-parallel) parts of your code in C or C++. To get these two compilers you first need the Command Line Tools, which once again are free to download from the App Store.
Anyway, as you might have already installed the Command Line Tools without even noticing (especially if you already have XCode), I suggest you check its presence by going to the folder /Library/Developer/ by clicking on Go to Folder in the Finder menu or by using the shortcut Shift - Apple Key - G after clicking the Finder icon.

Go to Folder Window
If you find the folder named CommandLineTools you can then check for needed packages by entering it, opening the usr folder and then bin. If you already have the CommandLineTools folder you should very likely even have the clang and gcc packages. If you don't then you will need to download them.
Open your Terminal (which can be found in /Applications/Utilities or, as usual, by typing “Terminal” in Spotlight and then clicking on its icon) and typing into the terminal:
xcode-select --install

Terminal on OS X
Then a window will appear, asking you if you want to download and install this package. Click yes, and the installation will proceed. Do not close the Terminal as we will need it later.

CommandLineTools installation window
Installing CUDA Packages
In the previously downloaded CUDA package, you should find three distinct packages: CUDA Driver, CUDA Toolkit and CUDA Samples. Despite the fact that the only essential one is the CUDA Driver, I suggest you install all of them, as they are very useful.

Packages selection during CUDA 6.0 installation
As always installation of Mac OS X packages is straightforward. Just click "Continue" on every window. At one point you will have to agree to terms and conditions by clicking on the Agree button when it appears) and then Install in the final one. Now you have CUDA 6.0 installed on your Mac, but it is not quite ready to be used. You have to carry out the final two steps. Open the Terminal (if you missed how to do this, just read a couple of paragraphs above) and then type or, more conveniently, copy and paste, the following:
export PATH=/Developer/NVIDIA/CUDA-6.0/bin:$PATH
export DYLD_LIBRARY_PATH=/Developer/NVIDIA/CUDA-6.0/lib:$DYLD_LIBRARY_PATH

Setting path variables on Terminal
This will set the environment path variables, which is necessary to use CUDA. If you have a Mac with a CUDA-capable graphic card, you probably actually have two graphic cards: an integrated one and a separate, discrete one. Since it is consumes a lot of batter power to always have the discrete card in use, OS X could prevent it by automatically switching between the two cards. So, when you want to use CUDA you have to be sure that your Mac won't "decide" to use the integrated card while you run a script.

System Preferences panel
Now go to System Preferences > Energy Saver (you can find System Preferences in the Utilities folder or using Spotlight), drag the Computer sleep bar to Never and uncheck Automatic Graphic Switching.

Energy Saver panel
Since it will get boring to follow this procedure every time you want to use CUDA, you can download gfxCardStatus (which is free and open-source) and switch between graphics cards in a couple of clicks directly from your menu bar, as you can see in the following picture. Actually, this was my choice and I'm pretty satisfied with how it works. Also, it could be useful to have direct control of graphics switching regardless of CUDA.

gfxCardStatus menu
Verification
Now that we have finished the installation procedure, CUDA should work. To be sure, it is worth following this verification procedure.
To see if the CUDA Driver is installed correctly, type the following into your terminal:
kextstat | grep -i cuda
You should get a response like this:

Checking for the CUDA Driver
If you get an error, reboot your Mac and try again. If this verification is once again unsuccessful, reinstall all the CUDA packages you downloaded from NVIDIA's website.
Now you have to check the installation of the nvcc compiler. As you should have installed CUDA in the suggested directory, using the Terminal you can check nvcc availability by typing:
/Developer/NVIDIA/CUDA-6.0/bin/nvcc -V
If you didn't install it here, just replace the above line with the directory you used.
If you get something like this:

Checking for NVCC
or anything that doesn't include "not found" you are ok. Otherwise, look for nvcc in the bin folder.
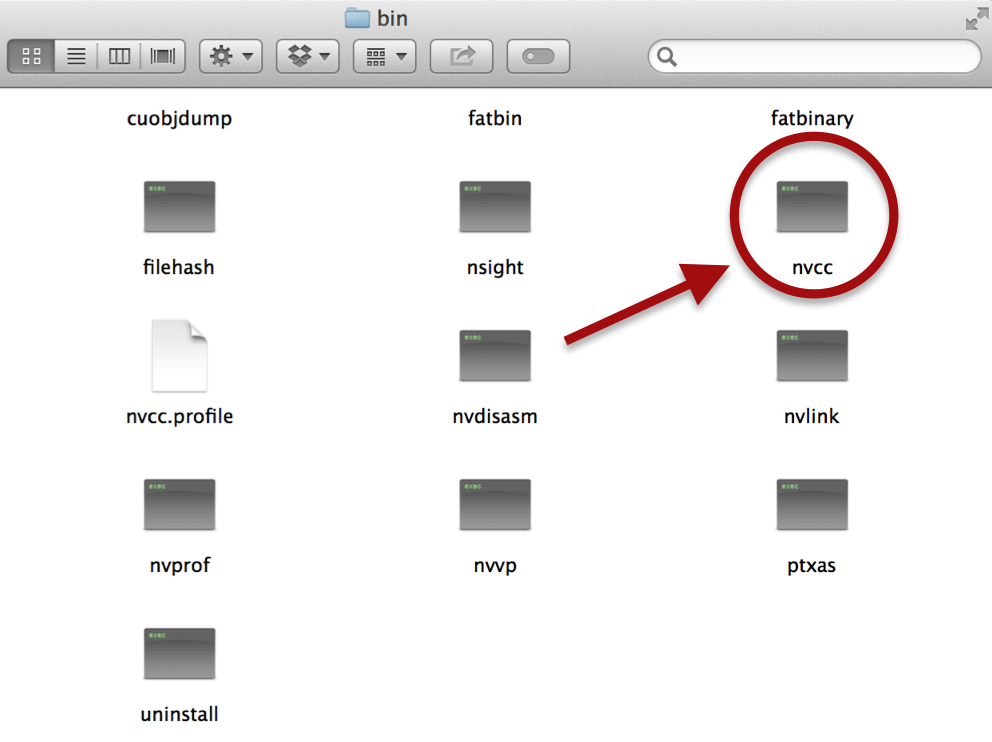
NVCC in bin folder
Now it's time to run some samples provided by NVIDIA. Here I make use of the samples suggested by NVIDIA, as two of them are useful to check if your GPU is ready to work with what you have just installed.
In your terminal go to the samples folder. Again, if you have installed CUDA in the suggested directory, just type this line in your terminal:
cd /Developer/NVIDIA/CUDA-6.0/samples/
and then copy and paste the following lines (you could write and run one sample at time, but this is a quicker way):
make -C 0_Simple/vectorAdd
make -C 0_Simple/vectorAddDrv
make -C 1_Utilities/deviceQuery
make -C 1_Utilities/bandwidthTest
If you get no errors, we've almost made it. Please note that you may experience some warnings (I had). This is not really a thing to worry about as CUDA will work anyway, but if you have some troubles don't hesitate to write a comment and I will answer you as soon as possible.
Let's now see the results of those tests (the last two scripts). The previous make commands created a new folder, which is where we want to go now. This new folder can be reached by adding bin/x86_64/darwin/release to the path of the "samples" folder, so you can type:
cd /Developer/NVIDIA/CUDA-6.0/samples/bin/x86_64/darwin/release
in your Terminal and then run both the script deviceQuery and bandwidthTest by writing:
./deviceQuery
./bandwidthTest
I suggest you run those scripts one at a time, but of course you can just copy and paste both these lines and press enter.
Note that the returned parameters will change depending on your hardware and software, so don't worry if you don't have the same lines as the following screens:

deviceQuery report - check the circled part

bandwidthTest report
If you can see what I highlighted in the above figures with circles, then congratulations! You can now use CUDA on your Mac!
In next set of articles I will write about programming in CUDA and, more generally, parallel computing, to provide you with a comprehensive tutorial on how to code your own CUDA scripts with useful financial examples.
In the meantime, I suggest you get more confident with this environment by having a look at NVIDIA's samples and the NVIDIA Nsight Eclipse edition IDE (where you actually write code), which can be found in /Developer/NVIDIA/CUDA-6.0/libnsight.


